Document Request Link
You can request the debtor to send you specific documents you need to complete your checklist. To do this, simply go to the debtor file and click the “Request Documents” button on the top of the page.

Selecting the required documents
When you get to this page, there are two ways you can define which document you require the document to upload.
1) The first way is you can select which checklist you want to send documents from. Once you select a checklist, click Apply.
2) The second way is to manually select a Folder name, a document Prefix and a relevant comment. Click Add Row.
To learn how to set up a checklist, click here
Checklist of document
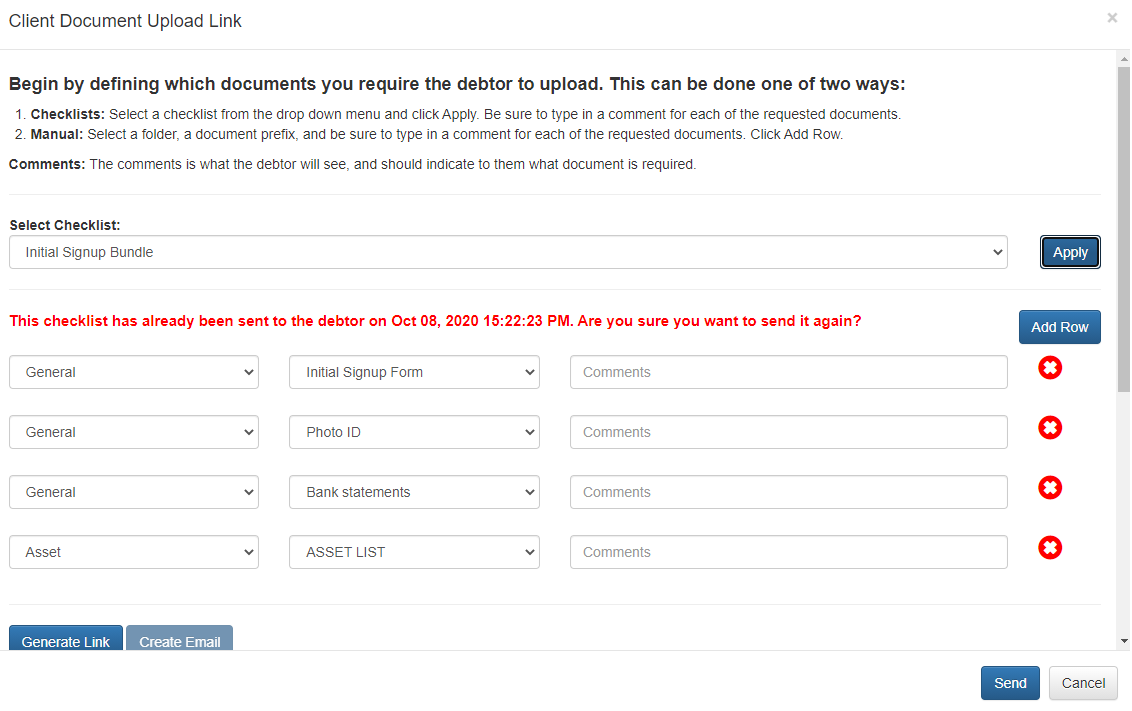
To utilize this checklist while sending out the Document Request Link, you can select the checklist on this page, and select APPLY. This will then populate the documents and their names to show you which ones will be sent. You can add or delete any documents to this list as well.
To add documents to the list:
1) Select a folder
2) Select a Prefix
3) Put any necessary comments
If you would like to add more than one document. click Add Row.
To delete a document, click the red X next to the line you would like to delete.

If a checklist has already been sent out to this debtor, Fileassure will alert you and you can choose whether or not you want to send it again.
Individual documents
Sending the document request link
Once you have established which documents you want to request, there are two ways of sending the debtor a secure upload link via Fileassure.
Sending an email to the debtor via Fileassure
After you complete inputting the document information, you can send an email with a link right to the debtor to upload the requested documents through Fileassure.
- Select an email template to send
- Input the email address of the debtor
- Verify that the email body is correct and make any changes.
- Click Send
- The debtor will then receive an email with a link directly to Fileassure to upload their specific requested documents

Once the debtor sends the documents through the provided link, the documents will be uploaded into their Fileassure record and named accordingly.
Generating a link to manually send to the debtor
After you complete inputting the document information, you can generate a link that you can copy and paste in an email or wherever you need it to be.
- Simply select your check list or document information then click Generate Link.
- Click the copy button to copy
- Paste whatever you need the link and close the Fileassure upload link box.

Uploading Documents – Debtor’s Perspective
When a debtor receives an email requesting documents from you, there will be a clear set of instructions on what they have to upload, and how.
There will be a required set of documents that has it’s designated upload area. They will choose a file based on what document is required.
After all documents are selected, they select upload.


Notifications
Once the debtor has uploaded the documents, the trustee assigned will receive a notification email stating which documents were uploaded.

This will also provide a link to take you directly to that debtor’s document page within Fileassure.

Setting up email templates

You can set up an email template to send to your clients to upload documents by going to the ADMIN section in Fileassure and selecting “Email Templates”
From there you will name the template in the TEMPLATE NAME section and select the drop down “Documents” in the template type box.
- Click add
Once you see the template you created in the list, click the blue icon on the right to complete the template.
- Select a subject line you want the debtor to see
- Select the template type
- Fill in the body of your email. Here you can also use the TAGGING options to the right to automatically populate information within your email.
For example: dragging @Firstname into the body, will automatically populate the debtor’s first name into the email as it shows in Fileassure.
- You then have an option to upload additional documents to send out
- Once you’re done, click UPDATE TEMPLATE

Document Request link report
On the Fileassure menu within a record, go down to the last option “Requested Documents Report”

This will bring you to the Requested Document Report for this debtor.
Heading | Description |
Name of document | The name of the actual document |
User | Which user requested the document |
Status | The status of the sent document |
Here you will see all the documents that were requested, by which user and the status. By default it will show the oldest requests first. If a link is expired, you have the ability to send the link again by pressing the RESEND button on the link you want to send.
